#how to
Explore tagged Tumblr posts
Text
HOW TO WRITE A CHARACTER WHO IS IN PAIN
first thing you might want to consider: is the pain mental or physical?
if it’s physical, what type of pain is it causing? — sharp pain, white-hot pain, acute pain, dull ache, throbbing pain, chronic pain, neuropathic pain (typically caused by nerve damage), etc
if it’s mental, what is the reason your character is in pain? — grief, heartbreak, betrayal, anger, hopelessness, fear and anxiety, etc
because your character will react differently to different types of pain
PHYSICAL PAIN
sharp and white-hot pain may cause a character to grit their teeth, scream, moan, twist their body. their skin may appear pale, eyes red-rimmed and sunken with layers of sweat covering their forehead. they may have tears in their eyes (and the tears may feel hot), but they don’t necessarily have to always be crying.
acute pain may be similar to sharp and white-hot pain; acute pain is sudden and urgent and often comes without a warning, so your character may experience a hitched breathing where they suddenly stop what they’re doing and clench their hand at the spot where it hurts with widened eyes and open mouth (like they’re gasping for air).
dull ache and throbbing pain can result in your character wanting to lay down and close their eyes. if it’s a headache, they may ask for the lights to be turned off and they may be less responsive, in the sense that they’d rather not engage in any activity or conversation and they’d rather be left alone. they may make a soft whimper from their throat from time to time, depends on their personality (if they don’t mind others seeing their discomfort, they may whimper. but if your character doesn’t like anyone seeing them in a not-so-strong state, chances are they won’t make any sound, they might even pretend like they’re fine by continuing with their normal routine, and they may or may not end up throwing up or fainting).
if your character experience chronic pain, their pain will not go away (unlike any other illnesses or injuries where the pain stops after the person is healed) so they can feel all these types of sharp pain shooting through their body. there can also be soreness and stiffness around some specific spots, and it will affect their life. so your character will be lucky if they have caretakers in their life. but are they stubborn? do they accept help from others or do they like to pretend like they’re fine in front of everybody until their body can’t take it anymore and so they can no longer pretend?
neuropathic pain or nerve pain will have your character feeling these senses of burning, shooting and stabbing sensation, and the pain can come very suddenly and without any warning — think of it as an electric shock that causes through your character’s body all of a sudden. your character may yelp or gasp in shock, how they react may vary depends on the severity of the pain and how long it lasts.
EMOTIONAL PAIN
grief can make your character shut themself off from their friends and the world in general. or they can also lash out at anyone who tries to comfort them. (five states of grief: denial, anger, bargaining, depression and eventual acceptance.)
heartbreak — your character might want to lock themself in a room, anywhere where they are unseen. or they may want to pretend that everything’s fine, that they’re not hurt. until they break down.
betrayal can leave a character with confusion, the feelings of ‘what went wrong?’, so it’s understandable if your character blames themself at first, that maybe it’s their fault because they’ve somehow done something wrong somewhere that caused the other character to betray them. what comes after confusion may be anger. your character can be angry at the person who betrayed them and at themself, after they think they’ve done something wrong that resulted in them being betrayed, they may also be angry at themself next for ‘falling’ for the lies and for ‘being fooled’. so yes, betrayal can leave your character with the hatred that’s directed towards the character who betrayed them and themself. whether or not your character can ‘move on and forgive’ is up to you.
there are several ways a character can react to anger; they can simply lash out, break things, scream and yell, or they can also go complete silent. no shouting, no thrashing the place. they can sit alone in silence and they may cry. anger does make people cry. it mostly won’t be anything like ‘ugly sobbing’ but your character’s eyes can be bloodshot, red-rimmed and there will be tears, only that there won’t be any sobbing in most cases.
hopelessness can be a very valid reason for it, if you want your character to do something reckless or stupid. most people will do anything if they’re desperate enough. so if you want your character to run into a burning building, jump in front of a bullet, or confess their love to their archenemy in front of all their friends, hopelessness is always a valid reason. there’s no ‘out of character’ if they are hopeless and are desperate enough.
fear and anxiety. your character may be trembling, their hands may be shaky. they may lose their appetite. they may be sweaty and/or bouncing their feet. they may have a panic attack if it’s severe enough.
and I think that’s it for now! feel free to add anything I may have forgotten to mention here!
#how to#writers on writing#writing#whump#writer#whumpblr#writers#writeblr#angst#writing guide#writing resources#writing challenge#writing inspo#writing inspiration#whump prompts#whump prompt#writing tropes#writing trope#ao3#archive of our own#fanfic#blorbo#comfort character#fanfiction#tropes#trope#whump tropes#prompts#prompt#whump trope
17K notes
·
View notes
Text
While this might seem to be a case of "Ugh, why not just make a full on app instead?" for a vast majority of us, it's not as bad as it sounds! In fact, going this route for Pillowfort via mobile is literally no different than those of us who uses the Unofficial AO3 App called Authorial (before it ... you know ... got taken off of the Play Store).
It's also not that bad if you're like me and rely heavily on the Saved Passwords method for, say, Firefox because you have a shit load of accounts on a website like Tumblr or Pillowfort. Why? Because you can use that in this take of a Pillowfort app. Is it the most ideal way to go? No. But at least it's UI is mobile-friendly, so that's something.

We're thrilled to announce Pillowfort now has a mobile app! Unlike a native app, however, you will install our Progressive Web App directly from our browser site. Once you do it'll behave the same as any other app. Check out the following guide for installation instructions and more info about PWAs: https://www.pillowfort.social/posts/5881832
Interested in joining Pillowfort? You can get on our rolling waitlist, which sends out new invites regularly based on how many users have registered recently. The current wait is less than an hour to get your invite!
#shin's psa#shin's public service announcement#shin's public service announcements#shin's guide#shin's guides#pillowfort#tutorial#tutorials#how to#public service announcement#public service announcements#guide#guides#rpc#rp#tumblr rp#tumblr rpc#roleplay community#community#roleplay#roleplaying#roleplaying community#tumblr
1K notes
·
View notes
Text
#art#humanity#kindness#people being people#society#human beings#faith in humanity#india#cleaning#life hacks#tips#how to#love#life#hope#feeling#emotions#existence#reality#real life
46K notes
·
View notes
Text
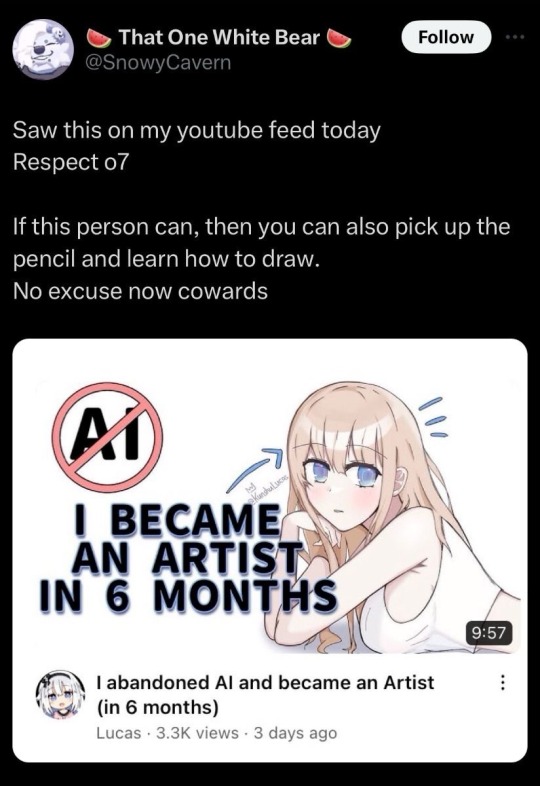
Needs to be said everywhere.
Gonna @ a bunch of ppl so this takes off
@maryland-no-rabies @maryland-officially @yes-im-youtube-kids @queen-eliz-2 @what-even-is-thiss @evil-apple-mail @randomitemdrop
Rb to spread the msg pls we need to kill ai art
761 notes
·
View notes
Text
Meet yourself where you're at
{source}
19K notes
·
View notes
Text
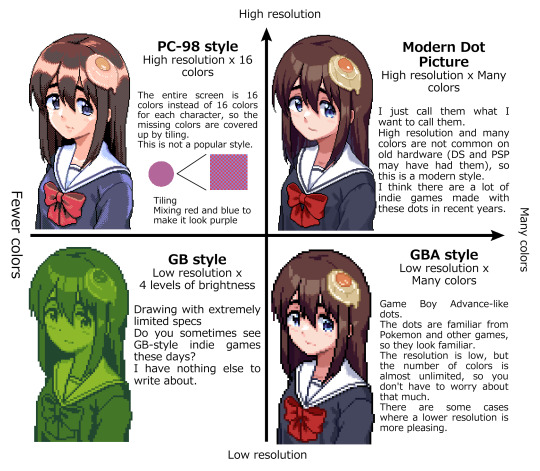
[ちぷしし / Chipushishi]
13K notes
·
View notes
Text

Mini Fairy Dragon - designed by ComplicatedKnots
Wow! This work is incredible!
by @complicatedknots / Instagram.com Find the original free video tutorial on YouTube.
28 notes
·
View notes
Note
How do you make your stamps? :0
Disclaimer: this is an obscenely long explanation, with pictures. Efficiency is stupid
So, for the static ones, I make a 99x56 px file on ibis paint x. Other programs are probably available online but I don't use them.
After that, I either upload an image I want to make into a stamp, or I draw one.
Then, I find a frame I want to use. Ill upload them here but let it be known I stole all of these right from deviantart


Most of them are from Lil-Devil-Melii on deviantart. The rest i have no idea. They're not all 99x56px but you can crop the canvas it's fine
Make sure to erase the edges of the picture , so they're transparent. It's not as cute otherwise
Upload those frames over your image in whatever art program you're using and viola, stamp.
For moving ones, it's a lot harder. Mostly because I refuse to download Photoshop.
There are a couple ways to do this. Some are simple animations, like with flashing text and whatnot. For these, you download the individual animation frames from your art program. Make sure it's transparent.
Then, upload each frame to ezgif.com under the option "GIF maker." You can play around with how fast each frame goes and whatnot but in the end, it'll be a stamp with some rad text that moves. This is easy, and doesn't make me want to shit my pants and cry. If you're new, do this. This is fun. This is good. This does not kill me inside
I made that↓ stamp with this method :)

this next one is how we turn gifs into stamps. This one makes me sad. It involves math and sucks. But we gotta do it. For the vibe
First, grab your gif. I'm using this cow gif because it's awesome

Then, I resize it using ezgif. Literally everything for this will be using ezgif. I am a simple man
At this point you should decide what frame to use. I'm using this one because its the first one I clicked

Figured out what size the inside of the frame is. That's what I resize the gif to, so the edges can be transparent. The inside of this one is 93x50 px, so those are the dimensions I'm making the gif.
Figure it out by putting the frame into ibis paint and realizing the canvas to fit just the inside of the frame, then seeing what the dimensions are. But there could be easier ways

Woah it's so small now
Then, still on ezgif, I go to the "crop" option.
Make sureeee to upload the smaller gif
press the button that says "extend canvas size", and then put the "width" and "height" as the dimensions for your FRAME. This'll put a bit of a transparent border around the gif. For this frame, I did 99px and 56px.
The "left" and "top" boxes show how many pixels the cropping happens from the edges of the canvas. The formula for finding that is
(width of gif / 2) - (difference between gif width and frame width / 2) = left box
For me it's (93 / 2) - (6 / 2) = 43.5
Then you do the same.for the height, which for me ends up being 22 from the top
This is reallyyy touchy and annoying though
Here's my result , with no visible difference

Okay so THEN you go to the "overlay" option, under "effects." And upload your frame. If the cropping was done right, you shouldn't have to move the frame at all and can just download it
Here's my result:

if you don't care about transparency, you can resize your gif to be the same size as the frame, and then put the frame over it. But I'm a slut for transparency
Anyways. I'm sorry if anything was unclear, it's two am. And I hope this was helpful :) these really are fun to make once you get it down
also if anyone has an easier way to make stamps from gifs, please god tell me
#web graphics#old web#neocities#custom#custom blinkies#stamps#page decor#web resources#da stamps#deviantart stamps#blinking gif#How to#tutorial#How to make stamps#Spacehey#deviantart#rentry graphics#old internet#early internet#stamp collecting#ezgif#stamp making#stamp template#Stamp frames#blinkies
6K notes
·
View notes
Text
I've been griping about the normalization of identity outing via social media for a while now. To put it simply, it's become almost some weird societal requirement that if you don't have every detail listed about yourself in your Twitter/FB/etc. bio, then it means you have "something to hide" or that you're not as "verifiable" because your account looks indistinct from that of a bot.
But that societal norm has really only benefited the people who profit off of that information in some way, whether it's through selling user data or through weaponizing details about a person against them.
I know that a lot of us love to use the fun little labels and acronyms in our bio that help others like us identify us as a 'safe person' or as someone who's in the same social/racial/identity groups as them. We're humans, we love to categorize things, it's in our nature (and it's fun!)
But if there's any time to start regulating that habit and challenging the norm that you're obligated to include all your personal info online - it's now.
There was a time when sock puppet accounts were expected and typical, not "suspicious".
There was a time when even age-sex-location was considered "too much information", but once it became the norm, we only EVER gave our personal information beyond generic ASL to people who we knew both online and in real life, or at the very least, people who we had known online for a significant enough amount of time that they had proved to be trustworthy (and even then, we didn't owe that information to anyone, ever; there are forum friends who I made online 10+ years ago and still talk to who do not know my personal information beyond broad strokes).
There was a time when simply being an avatar with a funny username was enough. And it still is enough, but massive platforms like Facebook and Twitter have been brainwashing us for years to believe that's not the case, under the guise of, "You wouldn't want to be dishonest, would you?" Through these same norms, we were led to believe that anime profile pictures are cringe, that having a fake online name is stupid, that the photos of you having fun at social events have to be taken JUST right otherwise you might imply to others that you're not actually having fun.
And considering how long these platforms have been around now, we have entire generations of children now who have been born and raised on that version of the ZuckMusk web, who have been taught that it "protects them" to express to everyone publicly their age, their school, their workplace, their family members, everything about themselves, because to not do so would be disingenuous.
None of this is to imply that the Internet was "safer" back in the day. I definitely should not have been on the Internet as much as I was when I was 13 in the late 2000's, it definitely did not benefit my brain development or my social skills. But the version of the Internet we currently exist in now is one that's been predicated on the false sense of security - the belief that if you're honest, everyone else has to be, too.
We've always had ways of identifying our safe people - by participating in the communities that we know are designed around our hobbies, our interests, our people. They might be small, they might not be as "cool" as the idea of netting yourself a big following of thousands of people, but they're also a lot safer and more genuine than that idealized following ever could be.
Don't feel pressured to include every bit of information about yourself in your bio. Even on Facebook, there's no rule that says you have to list your workplace, your school, your family members. There's no rule that says you have to list your personality type, queer labels, and neurodivergent disorders in your Twitter bio. There's no rule that you have to "prove" your life is real and fulfilled through the verification of photos, location tagging, and open-book sharing. If you share those photos, it should be because you genuinely want to share them, not because you feel some societal pressure to live up to others' expectations.
And I guarantee you, even your local mutuals on Facebook - your former classmates, family friends, distant relatives, coworkers, etc. - do not actually give that much of a damn about your personal life that they should be owed that much of a look into it on a daily basis. They've got their own shit going on, they literally do not need to know every detail about you.
I know it sounds scary. It also sounds kind of boring, when we've been used to a certain "way" of browsing and participating for years, that if we don't do so, it feels like being in the "out group" and that we're "breaking the rules". But I promise you, after spending over half my life online, those rules do not exist or benefit anyone who wouldn't profit off that information.
If you're wanting to learn how to branch off from major platforms like Facebook and Twitter and/or become more self-sufficient online, here are some guides to navigating the Internet like an old schooler that may help you!
FREE SITE BUILDER:
DIGITAL PIRACY 101:
(also in addition to everything mentioned here ^^^ they neglect to also mention Tor Browser which is a light and free-to-use browser software that allows you to browse anonymously; note that it's similar to a VPN in that it helps hide your identity online, HOWEVER it won't mask you from your ISP quite as effectively as a VPN, and if you sign into personal accounts with Tor, that's still going to obviously out you online lmao but I love using Tor for the odd time when I need to make a sock puppet for something and don't want it linked to my IP! and unlike a VPN, it's free to use!)
LEARN HOW TO USE RSS FEEDS:
People still use these! They're especially helpful for getting updates from your favorite pages and sites directly to your browser WITHOUT having to worry about stupid algorithm bullshit picking and choosing what you see. And many sites DO have RSS support once you know how to find it! (like adding in /rss at the end of a URL! Like this!)
FAKE EMAIL SERVICES:
LEARN HOW TO CODE IN HTML/CSS/JAVASCRIPT (AND MORE!):
DECENTRALIZED SOCIAL MEDIA PLATFORMS:
I hope this helps arm you with some new knowledge in how to navigate the Internet like a Certified Old Person™️(like meeee!) Make your secret alt blogs for besties! Make your formal Facebook accounts that are clean of personal information and present the most neutral, safe-for-work version of yourself and keep the fun stuff to the secret profiles and chat groups that are just for you and friends/family/etc!! It might be "inconvenient" to have multiple accounts for the same purpose, but it's also INCREDIBLY freeing and can make your online experience both safer and more enjoyable.

Being "less" of yourself online does not make you any less you. It is your identity - you do not owe any amount of it to anyone beyond yourself. And in times like these, your identity is your greatest asset. Protect it.
#how to#online safety tips#be safe on the internet y'all#oh and delete those period trackers#just get yourself an old school calendar / notebook for tracking#trust me on this one
464 notes
·
View notes
Text

I clearly had a brainrot for Blurr and Swerve for the last 2 days AND NOW IT IS WORSE AHAHAH
#How to#Can I#Blurrswerve#Swerveblurr#I don't quite like their mixed tags#Blurr x Swerve#eh#ehh#Whateverrr works gruh#cockroachdoodles#I LOVE THEM OKAY. A LOT. GODDAMN WHY I AM SO BAD I LOVE YOU PEOPLE#Blurr#Swerve#transformers#maccadam#the yappers#the fullmetal bartenders#the gay racers#<- OKAY I LOVE THESE TAGS MUCH MORE AHAHAHAHSGAHHSAH THANK YOU PFFHGTHE
2K notes
·
View notes
Note
Hi there! As a new fic writer, I was wondering if you had any writing advice (in general), but especially for writing dead dove. Do you have any advice on how to make your writing impactful and more emotionally devastating (lol)?
I’ve always thought writing that hits a reader so hard that it effects them emotionally—as if they’re a part of the story themselves—are some of the best written (and my personal favorites to read).
Thanks so much!
the most important and effective advice in general that I can give anybody when it comes to writing, is that ‘practice makes perfect’.
however, it’s also important to note that I am by no means saying my writing is ‘perfect’ — because you (general you) stop learning and improving your skills the second you believe what you’re doing has already reached the point where it’s ‘perfect’, and that’s where it becomes a problem. there’s a difference between being proud of yourself and your work (which you should always be) and thinking that your work is already ‘perfect’.
so what I’m saying is; as long as you’re willing to keep learning, you will only keep getting better. always practicing, always learning.
your first ever work may not be as satisfying as you want it to be, and that is okay. looking back, the first ever fic I wrote almost 8 years ago would not be satisfying if I wrote it recently — considering how my writing style has changed, as I’ve found (still am continuing to find) what represents myself best in my works, and how I’ve learned and improved my skills — but that fic was still my creation and I still am proud of myself and of the art I’ve created; the thing is that I’ve practiced and learned and I’ve come a long way, and that’s what really matters.
as for writing dead dove, my advice would be ‘don’t hold yourself back just because you think this is too violent or too disturbing’. as I’ve always said, there is no such thing as ‘too far’, ‘too graphic’ or ‘too triggering’ when it comes to any form of art.
that being said, content warning is just as important. warn your potential readers beforehand about what they might be getting themselves into if they decided to give your writing a read. this doesn’t mean you have to ‘spoil’ your fic to them, just let your readers know what kind of content is in the work — for instance, child death, blood and gore, non-con, drug use, human trafficking, etc — so that your readers can decide for themselves if the work is too much for them.
but that does NOT mean you should stop writing about This Specific Topic You Love to Write About just because it’s too triggering for your readers. why? because, while your readers should always be appreciated, you don’t write for them. you write FOR YOURSELF.
write what you want to read.
write whatever you want.
you, the writer, are the priority of your work.
don’t write something you don’t want to write just because it’s what your readers want.
don’t hold yourself back from writing what you want to write just because your readers don’t like it.
the most important factor about writing fanfics and/or original works is that writing should be something you enjoy. not a job (even if you write original work as a career), you should always have fun doing what you’re doing. that’s how you can do your best.
the trick to writing an impactful and emotionally devastating scene is if YOU are invested in what you’re writing enough that words come from within yourself. and you can only be invested in what you’re writing that much if you love and enjoy what you’re writing.
it’s more difficult to love and enjoy what you're doing, if you’re doing it to please other people.
you see where I’m getting at? it’s all about your love, enjoyment and passion as a writer.
you don’t write for your readers. you write for yourself, and your work will attract to it the right readers who love the same thing you do. and that’s how you successfully write an impactful and emotionally devastating scene that can make your readers cry.
don’t think about whether or not your writing will have enough impact on your readers when you write, because thinking about that will only distract and prevent you from reaching your best potential. just be invested in your writing.
don’t think about whether or not your readers will like this; because worrying about whether or not your readers will like it will also distract and prevent you from doing your best.
if you want your readers to feel as if they’re a part of the story themselves, you yourself have to be emotionally invested in it that you feel like you’re a part of the story yourself. and that can only happen if you’re doing it for you. not for your readers. not for anybody else. but for you.
repeat after me ‘I am the priority of my writing’.
again, be invested in your writing. write whatever you want to write, no matter how disturbing or fucked up or violent your work gets, write whatever you want. just don’t forget to tag all the trigger warnings properly.
you don’t ‘try to attract people to read your work’. you get invested in your work, you write whatever you want, out of love and passion, and your work will attract the right readers to it.
I have no doubt you will become one of the best writers out there, anon. keep learning. keep writing. I’m rooting for you.
#admin answers#how to#dead dove do not eat#writing advices#writing advice#writing#writer#writers#writeblr#whump#angst#whumpblr#writing tip#writing tips#ao3#fanfic#fanfiction#archive of our own#writing inspiration#writing inspo#writers on writing#writing challenge#prompts#prompt#trope#tropes
118 notes
·
View notes
Note
advice for a character who grips control like a lifeline. who wants to be in charge of every little thing because whenever they're not in control of something something bad could happen. has happened. they can't let a single variable be wild or in someone else's hands
How to Write a Controlling Character
Backstory Rooted in Trauma or Guilt
This character likely has a history that has ingrained the belief that they must be in control or face devastating consequences. Perhaps they once trusted someone else with something crucial—a promise, a responsibility, or a life-altering choice—and that trust was broken in a way that had lasting repercussions. For example, maybe they lost someone because they weren’t “careful enough,” or they experienced a betrayal when they trusted another person’s plan.
They might frequently flash back to this moment, possibly catching themselves thinking, If only I’d been the one in control, this wouldn’t have happened. This memory fuels their need to keep a tight grip on everything, especially if they’re in high-stakes situations.
Rigid Daily Routines and Habits
This character’s day is probably packed with small rituals and routines that give them a sense of security. From double-checking door locks to setting multiple alarms, they rely on routines to give themselves a sense of order. In fact, they might be nearly ritualistic about small actions—checking emails three times before sending, never leaving a task halfway finished, or meticulously arranging their workspace.
Even something as simple as making coffee can become a precise process. If someone moves one of their tools or a file from their desk, they may feel a spike of frustration or even anxiety, seeing it as a disruption to their personal “system.” They could feel that control in their daily life is the only thing keeping chaos at bay.
Intensely Observant of Details and Mistakes
They are hyperaware of mistakes or inefficiencies in others, mentally cataloging things like a coworker’s slight lateness or a friend’s disorganization. They may feel a sense of superiority (or frustration) over people who don’t “have it together” and take it upon themselves to organize or “fix” things for others.
In conversation, they might cut people off or “correct” them even over small points, often justifying this to themselves as necessary. For instance, if someone shares a plan that seems half-formed, this character could immediately dive in, pointing out potential problems or filling in details.
Controlling Relationships and Social Situations
This character struggles in relationships where they aren’t the dominant or organizing force. They might instinctively take over when making plans with friends, micromanaging even casual hangouts to make sure everything goes “right.” For example, they might pick the restaurant, plan the travel route, and check weather forecasts—assuming that if they don’t, no one else will think of these things.
When someone resists their attempts at control, they can respond defensively, often turning cold or resentful, unable to understand why anyone wouldn’t want them to manage the situation. Statements like, “Fine, but don’t blame me if this doesn’t go well,” are frequent in their interactions.
Extreme Anxiety or Panic When Control Is Taken Away
When things go beyond their reach, this character might experience panic, as if they’re suddenly powerless. For instance, if an unexpected roadblock prevents them from handling a task (like a canceled flight they needed to board, or a plan that falls apart), they might spend hours trying to regain control, calling every contact or frantically exploring alternatives.
Their reaction may feel extreme to others. Even minor setbacks—such as a colleague taking initiative on a project or a friend planning something without consulting them—can trigger a disproportionate response, like clenching their fists, pacing, or silently stewing as they feel the situation “slipping.”
Inability to Accept Help or Collaboration
Their controlling nature makes it hard for them to collaborate, as they believe their methods are the only ones that work. For them, accepting help feels like an admission of weakness or failure, so they rarely delegate or ask for assistance. If they do reluctantly accept help, they are constantly supervising or “suggesting” things, making it feel more like they’re still in charge.
In a team setting, they might take on all the major tasks, either out of distrust in others’ abilities or a feeling that no one will match their standards. Their motto could be something like, “If you want something done right, do it yourself,” even if that means working late or burning out.
Reluctance to Show Vulnerability or Need
Since vulnerability and control rarely coexist for them, they avoid showing weakness at all costs, preferring to mask stress or struggles as “just part of the job.” If they do become overwhelmed, they’re more likely to shut people out, saying, “I’ve got it handled,” even if it’s far from true.
When people push them to let go or share the load, they might lash out, accusing others of “just not understanding.” They often see their intense responsibility as a form of sacrifice, justifying their behavior with, “If I don’t handle this, who will?”
#creative writing#writeblr#ask box prompts#how to write a controlling character#how to write#writing tips#writing advice#writing resources#writing help#writing reference#writing prompts#how to#writing tools#writing techniques#writing stuff
2K notes
·
View notes
Text
I put together a simple guide for some HTML coding to use on AO3. The topics covered are the following;
Text Coding (bigger/smaller lettering, subscript/superscript, bold, and italics)
Headings (6 different header types)
Ways to add Translations, Definitions, and Unique Author Notes (Includes hover over text, Anchor Points, and Footers)
Lists (Numerical and Bullets)
Embedding URLs
Embedding Images
#AO3#Archive of Our Own#HTML#Tips and Tricks#Writing#Fanfiction#Fanfic#Writers#Writer#Fandom#Basic Coding#Guide#Reference#How To#idk what else to tag
517 notes
·
View notes
Text
Had a few folks interested in how I made the patches I posted for Solarpunk Aesthetic Week, so I thought I'd give y'all my step-by-step process for making hand-embroidered patches!
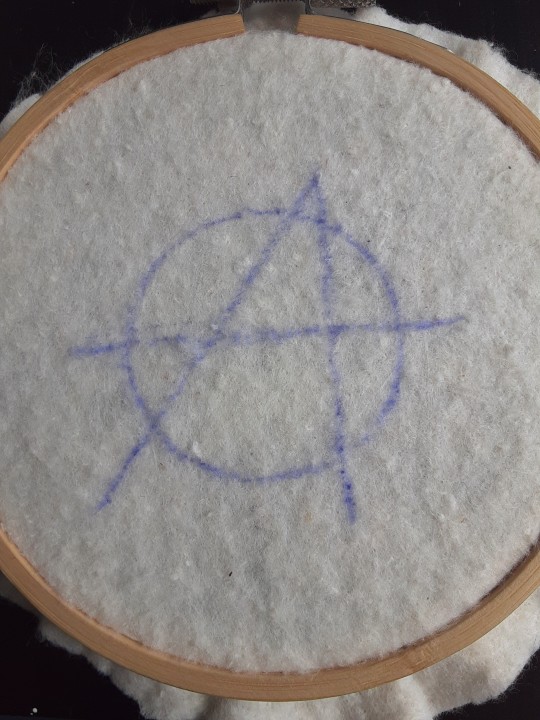
First, choose your fabric and draw on your design. You can use basically any fabric for this - for this project I'm using some felt I've had lying around in my stash for ages.
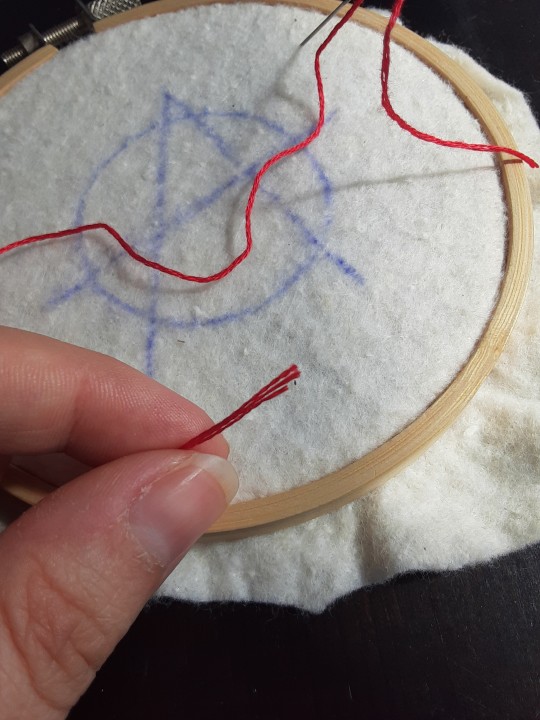
Next, choose your embroidery floss. For my patches I split my embroidery floss into two threads with 3 strands each, as pictured. You can use as many strands in your thread as you prefer, but for the main body of my patches I prefer 3 strands.
Next you're going to start filling your design using a back stitch.
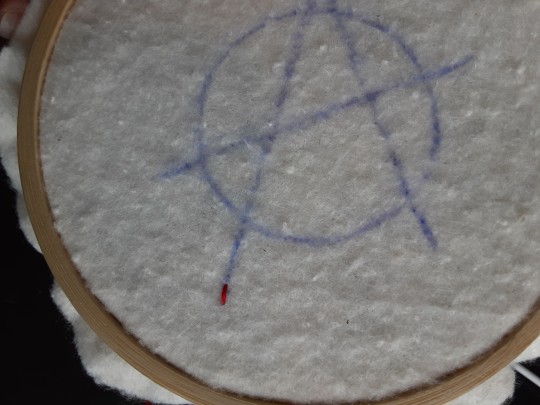
First, put in a single stitch where you want your row to start.
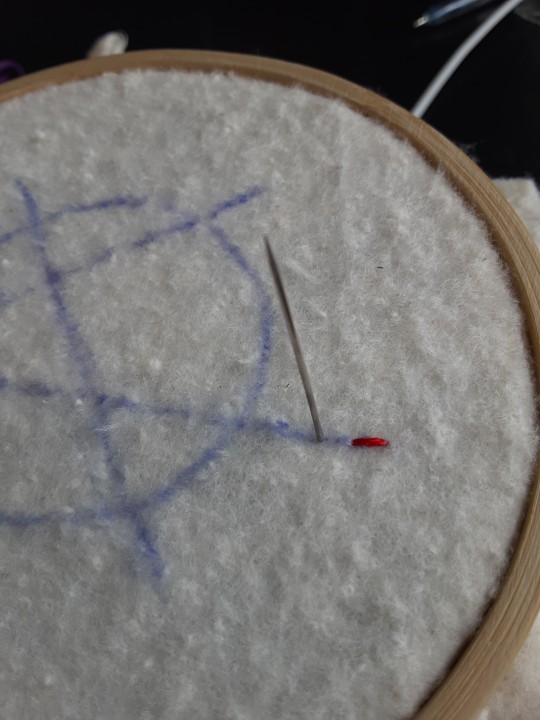
Poke your needle up through the fabric 1 stitch-length away from your first stitch.
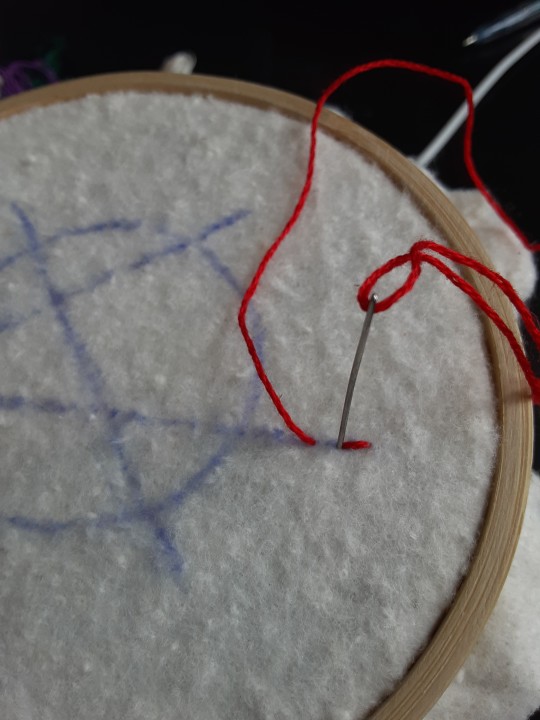
Poke your needle back down the same hole your last stitch went into so they line up end-to-end.
Repeat until you have a row of your desired length (usually the length of that colour section from one end to the other). Once you have your first row, you're going to do your next row slightly offset from your first row so that your stitches lay together in a brick pattern like this:
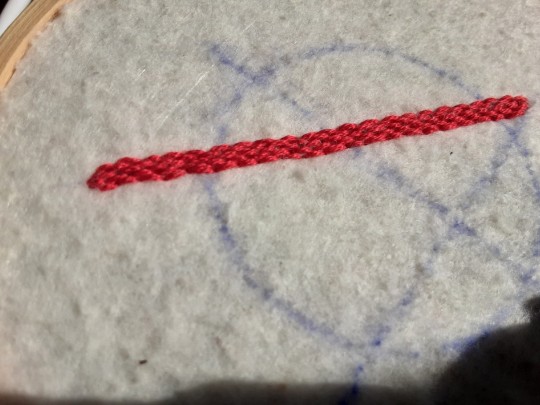
Make sure your rows of stitches are tight together, or you'll get gaps where the fabric shows through.
Rinse and repeat with rows of back stitch to fill in your patch design.
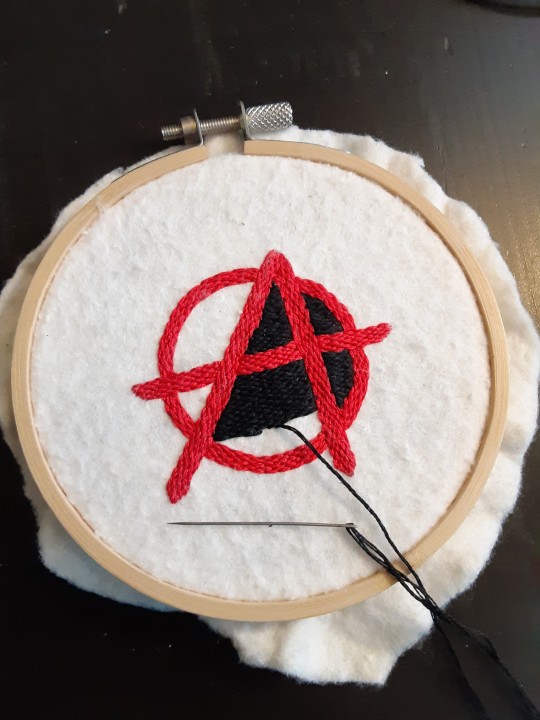
When you're almost to the end of your thread, poke your needle through to the back of the fabric and pull the thread under the back part of the stitching to tuck in the end. Don't worry if it looks messy - no one's gonna see the back anyway.
This next step is fully optional, but I think it makes the patch design really pop. Once your patch is filled in, you can use black embroidery floss to outline your design (or whatever colour you want to outline with - it's your patch, do what you want). I use the full thread (6 strands, not split) of embroidery floss to make a thicker outline.
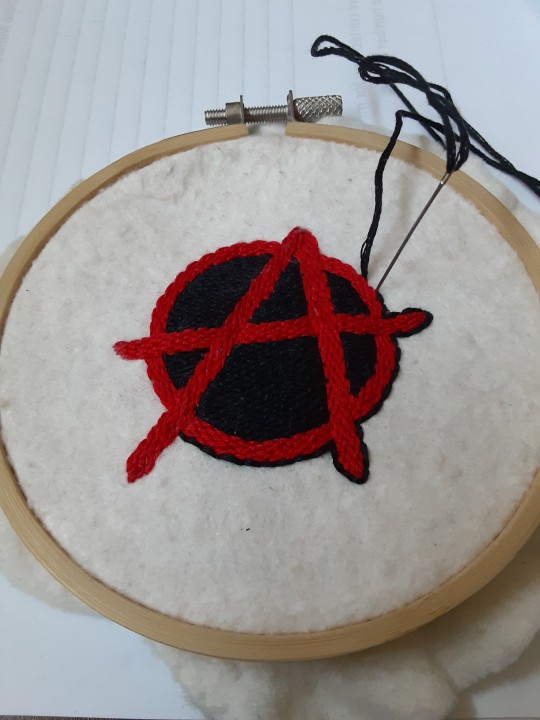
I use the same back stitch I used to fill the piece to make an outline that adds some separation and detail. You could use most any 'outlining' stitch for this, but I just use back stitch because it's just easier for me to do.
Once you're finished embroidering your patch, it's time to cut it out!
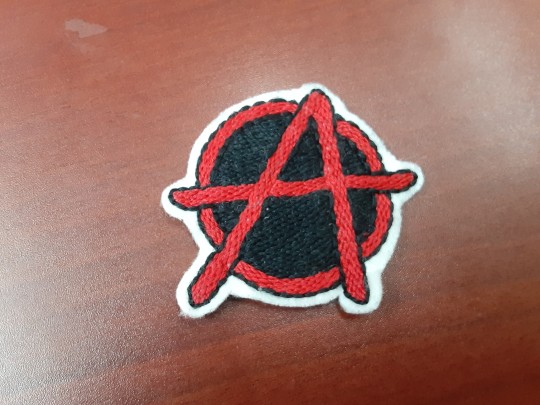
Make sure to leave a little border around the edge to use for sewing your patch on your jacket/bag/blanket/whatever, and be careful not to accidentally cut through the stitches on the back of the patch.
If you have a sturdy enough fabric that isn't going to fray, you can just leave it like this. If not, I recommend using a whip stitch/satin stitch to seal in the exposed edges (I find that splitting your embroidery floss into 3-strand threads works best for this).
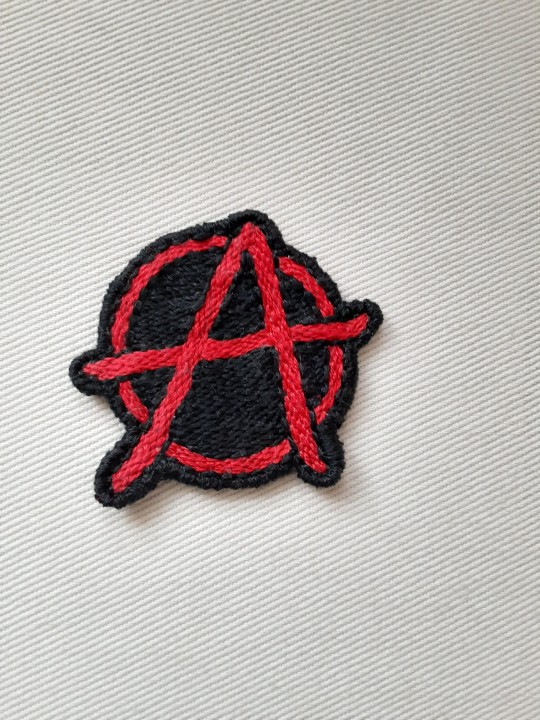
And then you're done! At this point you can put on iron-on backing if you want, or just sew it on whatever you wanna put it on. Making patches this way does take a long time, but I feel that the results are worth it.
Thanks for reading this tutorial! I hope it was helpful. If anyone makes patches using this method, I'd love to see them! 😁
#solarpunk aesthetic week#sewing#tutorial#sew on patch#punk diy#diy punk#punk aesthetic#handmade#solarpunk#handcrafted#embroidery#embroidered patch#how to#how to make a patch
18K notes
·
View notes

